Mixing Vocals in Ableton
Master the art of vocal processing using Ableton's stock plugins
Introduction to Vocal Mixing in Ableton
Vocal mixing is arguably the most critical aspect of music production. As the central element in most songs, vocals need to be clear, present, and emotionally impactful. Ableton Live offers a comprehensive suite of tools that allow you to achieve professional-quality vocal mixes using just the stock plugins.
Why Vocal Mixing Matters
Vocals carry the primary message and emotion of most songs. Even with stellar instrumental production, poorly mixed vocals can make a track sound amateur. Conversely, well-mixed vocals can elevate an otherwise simple production to professional standards.
Key Challenges in Vocal Mixing
- Dynamic Range - Vocals naturally have wide dynamic variations that need to be controlled
- Frequency Balance - Finding the right tonal balance without harshness or muddiness
- Sibilance - Managing harsh "s" and "t" sounds
- Spatial Placement - Positioning vocals in the mix with appropriate depth and width
- Consistency - Maintaining a consistent sound throughout the track
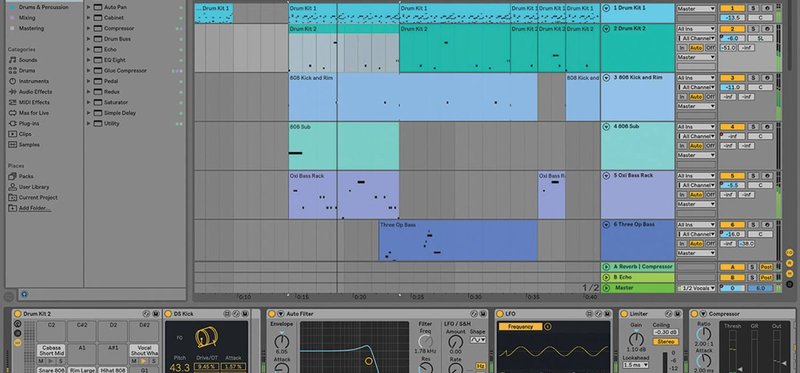
Ableton-Specific Tools for Vocal Processing
Ableton Live includes several powerful stock plugins that are perfect for vocal processing:
- EQ Eight - Surgical and broad frequency adjustments
- Compressor - Dynamic control with flexible settings
- Glue Compressor - Smooth compression for "gluing" vocal layers
- De-esser (using Multiband Dynamics) - Targeted sibilance control
- Reverb and Delay - Creating space and depth
- Utility - Stereo width and gain adjustments
Pro Tip
Create a default vocal processing rack in Ableton with your commonly used plugins and settings. Save this as a template to speed up your workflow on future projects.
Best Practices for Vocal Mixing
Developing a systematic approach to vocal mixing will help you achieve consistent, professional results. Here's a step-by-step workflow that has proven effective for many producers:
Step-by-Step Vocal Mixing Workflow
-
Start with Gain Staging
Before applying any processing, ensure your vocal track has appropriate levels. Aim for peaks around -6dB to -12dB to leave headroom for processing. Use Ableton's Utility device or clip gain to adjust levels.
-
Apply EQ to Remove Problematic Frequencies
Use EQ Eight to clean up the vocal. Start with a high-pass filter around 80-120Hz to remove rumble, then identify and cut narrow bands at problematic frequencies. Listen for resonances or harshness and reduce them with narrow Q values.
-
Use Compression to Control Dynamics
Apply Ableton's Compressor with moderate settings: attack time of 10-30ms, release time of 100-250ms, and a ratio of 2:1 to 4:1. Adjust the threshold for 3-6dB of gain reduction on the loudest parts.
-
De-essing to Reduce Sibilance
Use Multiband Dynamics as a de-esser by isolating the 5-8kHz range where sibilance occurs. Apply compression only to this band when it exceeds your threshold.
-
Add Effects for Space and Depth
Create an effects return track with reverb (start with small room settings) and another with delay (1/8 or 1/4 note with feedback under 30%). Send your vocal to these returns rather than inserting effects directly on the track.
-
Consider Parallel Processing
Create a duplicate of your vocal track with heavy compression and blend it with the original for added dimension and consistency without losing dynamics.
Common Mistakes to Avoid
- Over-processing - Adding too many plugins can make vocals sound unnatural
- Excessive EQ - Cutting too much can make vocals thin and lifeless
- Too much reverb - Can push vocals to the background and reduce clarity
- Ignoring automation - Vocals often need dynamic processing changes throughout a song
- Processing without context - Always check how vocals sit in the full mix
Professional Tips and Techniques
For Clarity and Presence
- Use a gentle high-shelf boost around 10kHz for "air"
- Apply subtle saturation to add harmonics and warmth
- Use multiband compression to control specific frequency ranges
- Create a "breath track" for natural-sounding spaces between phrases
For Consistency and Control
- Use volume automation before compression for major level issues
- Apply different processing for verses and choruses
- Create vocal doubles and harmonies for width and fullness
- Use sidechain compression to duck reverb when vocals are present
Educational Content: Key Concepts in Vocal Processing
EQ for Vocals
Equalization is essential for shaping the tonal balance of vocals. Here's how to approach it:
- High-pass filter (80-120Hz) - Removes unnecessary low frequencies and rumble
- Cut around 200-300Hz - Reduces muddiness and boxiness
- Cut or boost around 500-700Hz - Affects the "body" of the voice
- Boost around 2-4kHz - Increases presence and intelligibility
- Cut around 5-8kHz - Reduces sibilance if needed
- Gentle boost above 10kHz - Adds "air" and brightness
EQ Tip
Use Ableton's EQ Eight in Oversampling mode for more accurate high-frequency processing. Enable the Analyzer to visually identify problem frequencies.
Compression for Vocals
Compression helps control the dynamic range of vocals, making them more consistent and present in the mix:
- Attack time (10-30ms) - Allows transients through for natural articulation
- Release time (100-250ms) - Set to match the tempo and feel of the song
- Ratio (2:1 to 4:1) - Moderate compression for natural sound
- Threshold - Adjust for 3-6dB of gain reduction on the loudest parts
- Makeup gain - Restore perceived loudness after compression
For more aggressive styles or to add character, consider using multiple compressors in series with gentler settings rather than one heavy compressor.
De-essing Process
De-essing reduces harsh sibilance ("s", "t", "sh" sounds) that can be accentuated by EQ and compression:
- Identify the sibilant frequency range (typically 5-8kHz)
- Use Multiband Dynamics to isolate and compress only that range
- Set a fast attack (0.1-1ms) and quick release (10-50ms)
- Adjust the threshold so compression only engages on sibilant sounds
- Use moderate ratio (2:1 to 4:1) to sound natural
Effects Application
Reverb and delay add space and dimension to vocals:
- Reverb - Start with small room settings (0.8-1.5s decay time)
- Pre-delay - Use 20-40ms to maintain clarity
- Delay - 1/8 or 1/4 note with feedback under 30%
- Effects routing - Use return tracks for more control and efficiency
- Automation - Increase effects on certain words or at the end of phrases
Effects Tip
Create a short reverb for verses and a longer reverb for choruses. Automate the send levels to these different spaces throughout the song for a dynamic mix.
Before/After Processing Examples
The following video demonstrates the impact of proper vocal processing in Ableton Live:
Practical Assignments
Put your knowledge into practice with these hands-on exercises designed to improve your vocal mixing skills in Ableton Live:
Assignment 1: Basic Vocal Chain
Objective: Create a complete vocal processing chain using only Ableton's stock plugins.
Instructions:
- Record or import a dry vocal track into Ableton
- Create a processing chain with EQ Eight, Compressor, and De-esser (using Multiband Dynamics)
- Set up two return tracks with Reverb and Delay
- Apply the techniques discussed in this tutorial
- Compare your processed vocal with the dry version
Expected Outcome: A clean, professional-sounding vocal that sits well in the mix with appropriate clarity, consistency, and space.
Self-Evaluation Tips: Does the vocal sound natural? Is it consistently audible throughout the track? Are sibilants controlled? Does it have appropriate space without sounding distant?
Assignment 2: Parallel Vocal Processing
Objective: Use parallel processing techniques to add depth and character to vocals.
Instructions:
- Start with a basic vocal chain from Assignment 1
- Create a duplicate track of your vocal
- On the duplicate, apply heavy compression (8-12dB gain reduction)
- Add saturation or distortion to taste
- Blend this processed duplicate with your main vocal
- Experiment with different blend ratios
Expected Outcome: A vocal with added presence, consistency, and character while maintaining natural dynamics.
Self-Evaluation Tips: Does the parallel processing add character without making the vocal sound unnatural? Is there improved consistency in level without losing expression?
Assignment 3: Dynamic Vocal Mix
Objective: Create a dynamic vocal mix that changes processing throughout different sections of a song.
Instructions:
- Import a vocal track with verse and chorus sections
- Set up a basic vocal chain
- Create automation for EQ, compression, and effects sends
- Make the chorus vocals bigger and wider than verses
- Add special effects for transitions between sections
- Use volume automation for words that need emphasis
Expected Outcome: A dynamic vocal mix that enhances the emotional impact of different song sections.
Self-Evaluation Tips: Do the transitions between sections feel natural? Does the processing enhance the emotional impact of each section? Is the automation smooth and musical?
Resources
Recommended YouTube Tutorials
Additional Learning Materials
- Berklee Online - Vocal Production - Comprehensive course on vocal production techniques
- Production Music Live - Vocal Mixing - Specialized courses on vocal processing
- MusicTech - Vocal Mixing Guides - Articles and tutorials on vocal production
Key Terminology
- Gain Staging
- Setting appropriate signal levels throughout the processing chain to avoid distortion and maintain optimal signal-to-noise ratio.
- Sibilance
- Harsh "s" and "t" sounds in vocals that can be accentuated by compression and EQ.
- Parallel Processing
- Blending processed and unprocessed signals to combine the benefits of both.
- Automation
- Dynamic control of parameters over time to create movement and address changing needs throughout a song.
- Vocal Comping
- Selecting and combining the best parts of multiple takes to create a composite performance.