Mixing/Producing Drums into Beats
Master drum sound selection, layering, and processing in Ableton Live 12
Introduction to Drum Mixing and Beat Production
Drums form the foundation of most modern music productions. In electronic music, hip-hop, and many other genres, the quality and impact of your drum sounds can make or break a track. Ableton Live offers powerful tools for creating, processing, and mixing drums into cohesive, professional-sounding beats.
Importance of Drums in Modern Music Production
Drums serve several critical functions in a track:
- Rhythmic Foundation - Establishing the groove and feel of the track
- Energy and Impact - Creating dynamics and excitement
- Sonic Character - Defining the genre and style of the music
- Mix Cohesion - Providing a framework for other elements
- Emotional Response - Driving the physical and emotional response of listeners
Overview of Ableton's Drum Tools
Ableton Live provides several specialized tools for drum production:
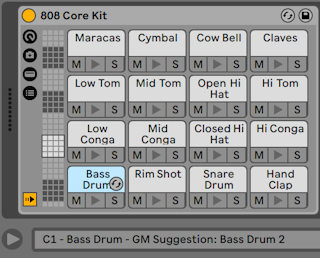
- Drum Rack - A powerful instrument for organizing and triggering drum samples
- Simpler/Sampler - Sample-based instruments for detailed sound manipulation
- Groove Pool - A library of timing and velocity patterns to add human feel
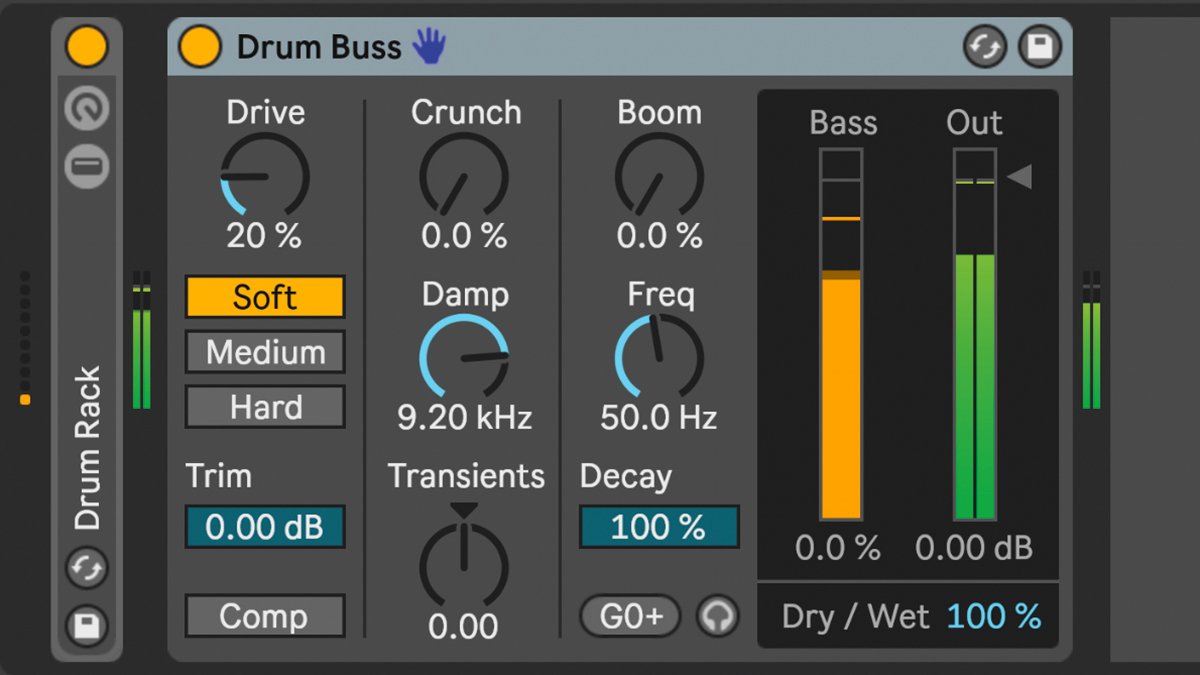
- Drum Buss - An audio effect designed specifically for processing drums
- Beat Repeat - A creative effect for generating rhythmic variations
- MIDI Effects - Tools like Random, Velocity, and Arpeggiator for creating variations
Key Challenges in Drum Mixing and Beat Creation
- Achieving Impact - Creating drums that hit hard without overwhelming the mix
- Balancing Elements - Finding the right relationship between kick, snare, hi-hats, and other elements
- Creating Movement - Adding variation to prevent repetitive patterns from becoming boring
- Genre Authenticity - Capturing the specific sound characteristics of different genres
- Technical Issues - Managing phase relationships, frequency masking, and dynamics
Pro Tip
Create a template project with your favorite drum processing chains already set up. Include your commonly used Drum Racks, return tracks with effects, and processing chains to speed up your workflow on future projects.
Drum Sound Selection and Processing
The foundation of great drum production begins with selecting the right sounds and processing them effectively to fit your track.
Tips for Choosing and Layering Drum Samples
- Start with Quality Samples - Begin with high-quality, well-recorded samples that match your genre
- Consider the Context - Choose sounds that complement the other elements in your track
- Layer Strategically - Combine samples to create more complex and unique sounds:
- Kick drums: Layer a sub kick for low end with a punchy kick for attack
- Snares: Combine acoustic snares for body with electronic snaps for cut
- Hi-hats: Layer different hat samples for more texture and complexity
- Mind the Phase - Check for phase cancellation when layering similar sounds
- Consider Tuning - Tune drum samples to match the key of your track, especially kicks and toms
Processing Individual Drum Elements
Kick Drum Processing
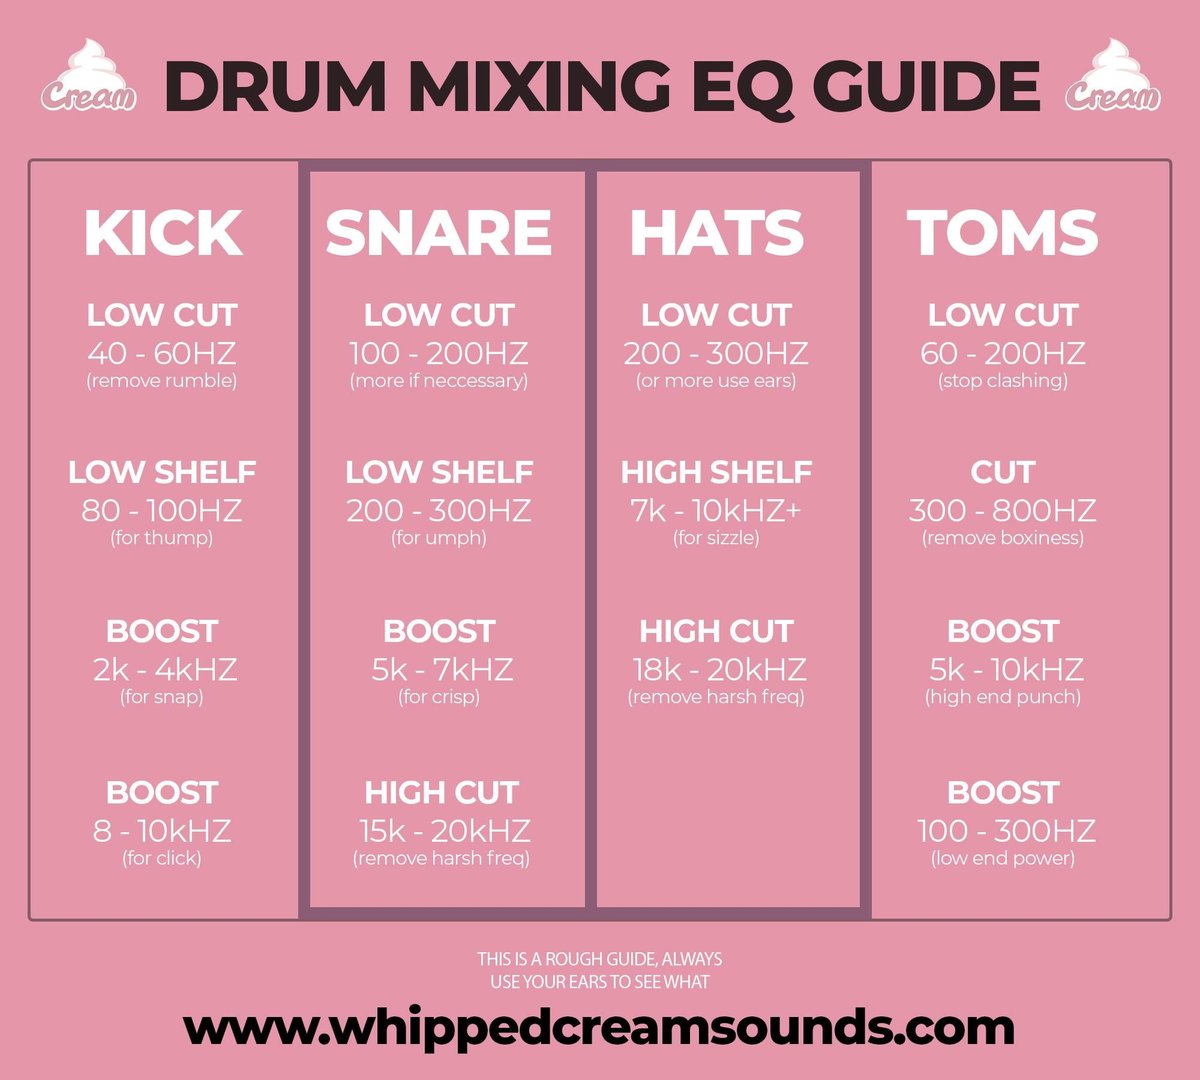
- EQ: Boost around 50-100Hz for weight, cut at 300-500Hz to reduce muddiness, boost at 2-4kHz for click
- Compression: Medium attack (10-30ms), fast release (100-200ms), 4:1 ratio
- Saturation: Add subtle harmonics for warmth and presence
- Transient Design: Enhance attack for more punch
Snare Processing
- EQ: Boost around 200Hz for body, cut at 400-600Hz to reduce boxiness, boost at 5-8kHz for snap
- Compression: Fast attack (5-10ms), medium release (150-250ms), 4:1 ratio
- Reverb: Short room reverb for space
- Parallel Compression: Add density and sustain
Hi-Hat Processing
- EQ: High-pass at 500Hz, boost around 10kHz for brightness
- Compression: Fast attack (1-5ms), fast release (50-100ms), light ratio (2:1)
- Stereo Width: Widen for spatial interest
- Velocity Variation: Program with varied velocities for realism
Percussion Processing
- EQ: Target the characteristic frequency of each element
- Panning: Spread across the stereo field
- Effects: Creative use of delay and reverb
- Modulation: Subtle chorus or phaser for movement
Using Ableton's Drum Rack Effectively
-
Organize Samples Logically
Arrange your drum samples in a consistent pattern across the Drum Rack. For example, place kicks on C1, snares on D1, closed hi-hats on F#1, etc. This makes programming and playing more intuitive.
-
Utilize Choke Groups
Assign open and closed hi-hats to the same choke group so they cut each other off naturally. This creates more realistic hi-hat patterns.
-
Process at Multiple Levels
Take advantage of Drum Rack's nested structure by processing at different levels:
- Individual sample level: Process each sample in its own chain
- Pad level: Process all layers of a single drum element
- Return chains: Create shared effects for multiple pads
- Rack level: Process the entire drum kit
-
Use Macro Controls
Map key parameters to macro controls for quick adjustments. For example, create macros for kick punch, snare snap, or overall kit ambience.
Sound Design Techniques for Custom Drums
- Synthesize Kick Drums - Create custom kicks using Operator or Wavetable with a pitch envelope
- Layer Acoustic and Electronic Elements - Combine recorded drums with synthesized elements
- Process with Creative Effects - Use effects like frequency shifter, vocoder, or grain delay for unique textures
- Resample and Manipulate - Process drums, record the output, and further manipulate the recordings
- Use Found Sounds - Incorporate non-traditional sound sources like field recordings or foley
Common Mistakes to Avoid
- Overprocessing - Adding too many effects can destroy the natural punch of drums
- Ignoring Phase Issues - Phase cancellation can weaken your drums, especially when layering
- Too Much Low End - Excessive bass in drums can make your mix muddy and reduce impact
- Inconsistent Levels - Dramatic volume differences between drum elements can create an unbalanced groove
- Neglecting Context - Processing drums in solo without checking how they sit in the full mix
Beat Programming and Arrangement
Creating engaging drum patterns goes beyond just selecting and processing sounds. The rhythmic programming and arrangement of your beats are crucial for establishing groove and maintaining interest throughout your track.
Creating Groove and Feel in Beats
- Understand Basic Patterns - Learn the fundamental patterns for different genres:
- Four-on-the-floor for house and techno
- Half-time patterns for hip-hop and trap
- Breakbeat patterns for drum & bass and jungle
- Use Velocity Variation - Vary the velocity of hits to create dynamic emphasis
- Apply Subtle Timing Shifts - Move certain elements slightly off the grid for a more human feel
- Create Syncopation - Place accents on off-beats to create tension and interest
- Consider Microrhythms - Explore the subtle timing relationships between different drum elements
Programming Techniques for Different Genres
House/Techno
- Four-on-the-floor kick pattern
- Offbeat hi-hats (typically on 8th notes)
- Snare/clap on beats 2 and 4
- Subtle percussion for groove
- Gradual addition/removal of elements for progression
Hip-Hop/Trap
- Half-time feel with kick on 1 and snare on 3
- Rapid hi-hat patterns with rolls and pitch shifts
- 808 bass integrated with kick pattern
- Triplet-based rhythms
- Pattern switches for verse/chorus transitions
Using Ableton's Groove Pool and Quantization
-
Access the Groove Pool
Open the browser and navigate to the Groove Pool section to find pre-made groove templates.
-
Apply Grooves to MIDI Clips
Drag a groove onto a MIDI clip to apply its timing and velocity characteristics. Adjust the Amount parameter to control how strongly the groove affects your pattern.
-
Extract Grooves from Audio
Right-click on an audio clip and select "Extract Groove" to create a groove template from existing audio. This is great for capturing the feel of sampled breaks.
-
Use Smart Quantization
Instead of fully quantizing to the grid (100%), use partial quantization (50-80%) to maintain some human feel while correcting major timing issues.
Arrangement Tips for Dynamic Drum Patterns
- Create Variations - Develop multiple versions of your core pattern with different densities and energies
- Use Build-ups and Breakdowns - Gradually add or remove elements to create tension and release
- Implement Fills and Transitions - Add drum fills at the end of phrases to mark transitions between sections
- Consider Energy Flow - Map out the energy level of your track and adjust drum complexity accordingly
- Use Automation - Automate effects parameters, filter cutoffs, or reverb sends to create movement
Creative Tip
Try using Ableton's Follow Actions to create evolving drum patterns that change automatically. Set up multiple short clips with different patterns and let them trigger each other based on rules you define.
Mixing Techniques for Drums
Once you've selected your sounds and programmed your patterns, proper mixing techniques will ensure your drums sound clear, powerful, and cohesive in the context of your full track.
Balancing Levels and Panning
- Set a Foundation with the Kick - Start by setting your kick drum level as a reference point
- Balance the Snare - Typically, the snare should be at a similar level to the kick or slightly lower
- Add Hi-hats and Cymbals - These should sit below the kick and snare but remain clearly audible
- Mix in Percussion - Additional percussion elements should complement without overwhelming
- Use Panning Strategically:
- Keep kick, snare, and bass elements centered
- Pan hi-hats slightly (10-30%) to one side
- Spread percussion elements across the stereo field
- Consider traditional drum kit positioning for acoustic drums
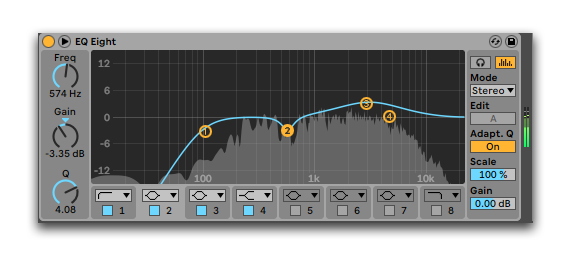
EQ Strategies for Drum Clarity
- Create Frequency Space - Ensure each drum element has its own frequency range:
- Kick: Focus on 50-100Hz for weight and 2-4kHz for click
- Snare: Focus on 200-300Hz for body and 5-8kHz for snap
- Hi-hats: Focus on 8-12kHz for brightness
- Toms: Focus on 100-300Hz for body and 3-5kHz for attack
- Use High-Pass Filters - Remove unnecessary low frequencies from elements that don't need them
- Make Complementary Cuts - If two elements compete in the same frequency range, cut that range from the less important element
- Consider the Full Mix - EQ drums in the context of other instruments, especially bass
Compression Approaches for Punch and Consistency
-
Individual Compression
Apply compression to individual drum elements to control their dynamics:
- Kick: Medium attack (10-30ms), fast release (100-200ms), 4:1 ratio
- Snare: Fast attack (5-10ms), medium release (150-250ms), 4:1 ratio
- Hi-hats: Fast attack (1-5ms), fast release (50-100ms), light ratio (2:1)
-
Bus Compression
Apply gentle compression to your drum bus to "glue" elements together:
- Use Ableton's Glue Compressor with a 2:1 or 4:1 ratio
- Set a medium attack (10-30ms) and auto or tempo-synced release
- Aim for 2-4dB of gain reduction
-
Use Ableton's Drum Buss Device
This specialized device combines compression, saturation, and transient processing:
- Adjust Drive for saturation and character
- Use Crunch for mid-range distortion
- Set Boom for low-end enhancement
- Adjust Transients for attack emphasis
Bus Processing and Parallel Techniques
- Create a Drum Bus - Route all drum elements to a group track for collective processing
- Set Up Parallel Compression:
- Create a return track with heavy compression (8:1 ratio or higher)
- Send varying amounts of your drum elements to this track
- Blend the compressed signal with the original for added punch and sustain
- Try Parallel Saturation - Add a return track with saturation or distortion for added harmonics and character
- Consider Multiband Processing - Use multiband compression or dynamic EQ to target specific frequency ranges
Spatial Effects for Depth and Width
- Use Room Reverb Selectively - Add short room reverb (0.3-0.8s) to create a sense of space:
- Apply more to snares and toms
- Use less on kicks and hi-hats
- Consider a dedicated reverb return track for drums
- Try Stereo Widening Techniques:
- Use Ableton's Utility device to adjust width on hi-hats and percussion
- Apply subtle chorus or ensemble effects to add stereo movement
- Use mid-side processing to enhance stereo elements while preserving mono compatibility
- Experiment with Delay - Add subtle delays (1/16 or 1/32 notes) to create depth and movement
- Consider Mono Compatibility - Check your mix in mono to ensure it translates well to all playback systems
Mixing Pitfalls to Avoid
- Over-compression - Squashing the life out of your drums
- Excessive reverb - Creating a washy, undefined drum sound
- Frequency masking - Allowing drums to compete with other elements
- Inconsistent levels - Creating an unbalanced groove
- Ignoring the low end - Not properly managing the relationship between kick and bass
Practical Assignments
Put your knowledge into practice with these hands-on exercises designed to improve your drum mixing and beat production skills in Ableton Live:
Assignment 1: Drum Sound Layering and Processing
Objective: Create a custom drum kit using layering and processing techniques.
Instructions:
- Create a new Drum Rack in Ableton Live
- For the kick drum:
- Layer a sub-heavy kick with a punchy, click-heavy kick
- Process with EQ to ensure they complement each other
- Add compression to control dynamics
- Use saturation to add character
- For the snare:
- Layer an acoustic snare with an electronic snap
- Add a clap for additional texture
- Process with EQ, compression, and reverb
- Create at least three variations of hi-hats with different characters
- Add three unique percussion elements
- Set up appropriate choke groups for hi-hats and similar sounds
- Create a simple beat to test your drum kit
Expected Outcome: A cohesive, custom drum kit with layered sounds that have depth, punch, and character.
Self-Evaluation Tips: Do the layered sounds work well together without phase issues? Does each element have its own sonic space? Does the kit sound cohesive while maintaining the unique character of each element?
Assignment 2: Beat Programming with Groove and Variation
Objective: Create a dynamic beat with groove and variations for different song sections.
Instructions:
- Create a basic 1-bar beat pattern with kick, snare, and hi-hats
- Apply a groove template from Ableton's Groove Pool
- Create three variations of this pattern:
- A sparse version for intros/verses
- A standard version for main sections
- An intense version for choruses/drops
- Program transitions and fills between sections
- Experiment with velocity variations to add dynamics
- Try adding subtle timing shifts to create more human feel
- Arrange the patterns into a complete 16-bar sequence with logical progression
Expected Outcome: A dynamic drum arrangement that maintains interest throughout and supports the energy flow of a track.
Self-Evaluation Tips: Does the beat have a natural, groovy feel? Do the variations create interest without losing cohesion? Do the transitions between sections feel smooth and musical?
Assignment 3: Complete Drum Bus Processing Chain
Objective: Create a professional drum mixing chain using bus processing techniques.
Instructions:
- Import a multi-track drum recording or program a complete beat
- Process individual drum elements with basic EQ and compression
- Create a drum bus by grouping all drum tracks
- Set up a processing chain on the drum bus:
- EQ for overall tonal balance
- Compression for cohesion (try Glue Compressor)
- Saturation for character
- Drum Buss device for additional punch and character
- Create a parallel compression return track:
- Set up a compressor with aggressive settings
- Send varying amounts from different drum elements
- Blend to taste
- Create a reverb return for spatial effects
- Balance all elements in the context of a full mix
Expected Outcome: A polished, professional-sounding drum mix with punch, clarity, and cohesion.
Self-Evaluation Tips: Do the drums sound punchy and clear? Is there a good balance between individual character and overall cohesion? Do the drums sit well in the context of other instruments?
Resources
Recommended YouTube Tutorials
Additional Learning Materials
- Ableton's Official Drum Programming Guide - Official guide to beat making
- Production Music Live - Drum Processing - Specialized courses on drum production
- MusicTech - Drum Mixing Guides - Articles and tutorials on drum production
Key Terminology
- Transient
- The initial attack portion of a drum sound, which contains much of its character and impact.
- Bus Processing
- Applying effects to a group of drums routed to the same channel, creating cohesion and saving CPU resources.
- Parallel Compression
- Blending heavily compressed signals with the original uncompressed sound to add punch while maintaining dynamics.
- Saturation
- Adding harmonic distortion to a sound to create warmth, presence, and character.
- Groove
- The timing and velocity variations that create the feel and human quality of a rhythm.
- Quantization
- The process of aligning notes to a timing grid, which can be applied at different strengths to balance precision with human feel.