Compression and Reductive EQ Techniques
Master dynamic control and frequency management in Ableton Live
Introduction to Compression and EQ
Compression and equalization (EQ) are two of the most fundamental and powerful tools in music production. Understanding how to use these tools effectively is essential for creating professional-sounding mixes in Ableton Live.
Fundamental Concepts and Importance
Compression and EQ work together to shape the dynamic and frequency content of your sounds:
- Compression controls the dynamic range (the difference between the loudest and quietest parts) of a signal
- EQ shapes the tonal balance by boosting or cutting specific frequency ranges
- Together, they help create clarity, consistency, and cohesion in your mix
When used properly, these tools solve common mixing problems:
- Inconsistent levels that make some parts hard to hear
- Frequency masking where sounds compete for the same frequency space
- Lack of punch and impact in rhythmic elements
- Harshness or muddiness in the overall mix
How These Tools Shape Sound
Compression and EQ affect sound in complementary ways:
Compression Effects:
- Controls volume peaks
- Increases perceived loudness
- Enhances sustain
- Adds "glue" to multiple elements
- Can add character and color
EQ Effects:
- Removes unwanted frequencies
- Creates space in the frequency spectrum
- Enhances desirable characteristics
- Corrects tonal imbalances
- Helps elements sit together in a mix
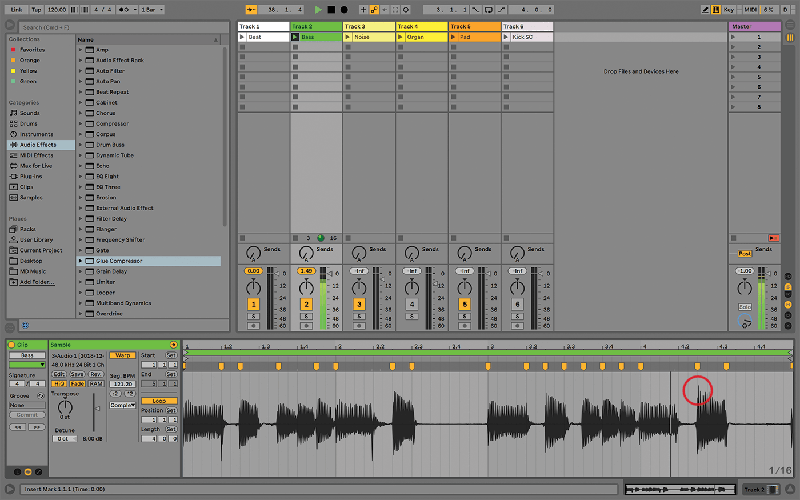
Ableton's Native Compression and EQ Tools
Ableton Live includes several powerful devices for compression and EQ:
- Compressor - Versatile dynamics processor with multiple detection modes
- Glue Compressor - Modeled after a classic bus compressor for "gluing" sounds together
- Multiband Dynamics - Frequency-specific compression and expansion
- EQ Three - Simple three-band equalizer
- EQ Eight - Comprehensive eight-band equalizer with multiple filter types
- Channel EQ - Quick three-band EQ with spectrum analyzer (Live 11+)
Pro Tip
Create an Audio Effect Rack combining different compressors in parallel to get the best characteristics of each. For example, use the standard Compressor for transient control and the Glue Compressor for overall cohesion.
Compression Techniques
Compression is often misunderstood and misused by beginners. Understanding the different types of compression and how to set parameters appropriately is crucial for effective dynamic control.
Different Types of Compression
- Downward Compression - Reduces the volume of signals that exceed the threshold (most common)
- Upward Compression - Increases the volume of signals below the threshold
- Parallel Compression - Blends compressed and uncompressed signals
- Multiband Compression - Applies different compression to different frequency ranges
- Sidechain Compression - Uses one signal to control the compression of another
Parameter Explanations
| Parameter | Function | Typical Settings |
|---|---|---|
| Threshold | Level at which compression begins | Set for 3-6dB of gain reduction |
| Ratio | Amount of compression applied | 2:1 to 4:1 for subtle, 8:1+ for dramatic |
| Attack | Time before compression engages | Fast (0-10ms) for transient control, Slow (10-50ms) to preserve transients |
| Release | Time for compression to disengage | 50-250ms, often tempo-synced (e.g., 1/8 note) |
| Knee | Transition from uncompressed to compressed | Soft for subtle, Hard for precise control |
| Makeup Gain | Volume added after compression | Match the level reduction from compression |
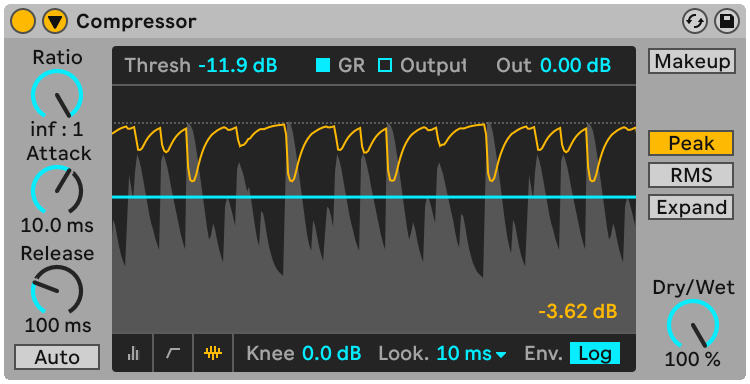
Understanding Attack and Release
Think of attack as how quickly the compressor "grabs" the sound, and release as how quickly it "lets go." Fast attack tames transients but can dull the sound. Slow release maintains consistent level but can cause pumping effects.
Genre-Specific Compression Approaches
Electronic Music
- Faster attack times for precise control
- Higher ratios for more obvious effect
- Heavy use of sidechain compression
- Often uses compression as a creative effect
Acoustic/Organic Music
- Slower attack times to preserve natural transients
- Lower ratios for subtle dynamic control
- Multiple compressors with gentle settings
- Focus on maintaining natural dynamics
Visual Examples of Compression Settings
Here are some starting points for different instruments:
- Vocals - Threshold: -20dB, Ratio: 3:1, Attack: 15ms, Release: 150ms
- Kick Drum - Threshold: -15dB, Ratio: 4:1, Attack: 10ms, Release: 100ms
- Bass - Threshold: -18dB, Ratio: 4:1, Attack: 20ms, Release: 200ms
- Acoustic Guitar - Threshold: -22dB, Ratio: 2:1, Attack: 25ms, Release: 250ms
- Full Mix - Threshold: -10dB, Ratio: 2:1, Attack: 30ms, Release: 300ms
Common Compression Mistakes
- Over-compression - Squashing the life out of your sound
- Too fast attack - Losing important transients and impact
- Too slow release - Creating unnatural pumping effects
- Compressing without purpose - Using compression without a clear goal
- Ignoring gain staging - Not setting proper levels before compression
Reductive EQ Techniques
Reductive EQ is the practice of cutting unwanted frequencies rather than boosting desired ones. This approach is often more effective for creating clarity and space in a mix.
Philosophy of Subtractive EQ
The core principle of reductive EQ is "cut narrow, boost wide" (if you boost at all). This approach offers several advantages:
- Reduces phase issues that can occur with excessive boosting
- Preserves headroom in your mix
- Creates space for each element to occupy its own frequency range
- Often results in a more natural, balanced sound
- Helps prevent frequency masking between instruments
EQ Tip
Think of EQ as a sculptor removing material rather than adding it. Just as a sculptor reveals the statue within the stone by removing excess material, you reveal the best sound by removing unwanted frequencies.
Frequency Problem Identification
Before applying EQ, you need to identify problematic frequencies:
-
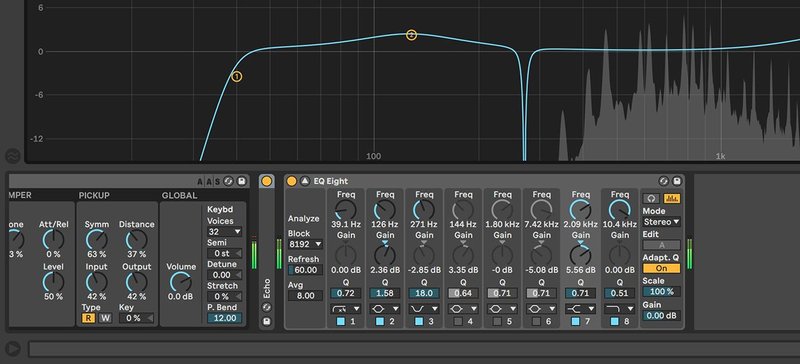
Use the Frequency Analyzer
Enable the analyzer in EQ Eight to visualize the frequency content of your sound.
-
Sweep and Listen
Create a narrow boost (high Q value) and sweep through frequencies while listening for problematic areas.
-
Solo and Context
Listen to the sound both in solo and in the context of the full mix to identify masking issues.
-
Identify Common Problem Areas
Learn to recognize common issues like mud (200-300Hz), boxiness (400-600Hz), harshness (2-4kHz), and sibilance (5-8kHz).
Step-by-Step EQ Workflow
-
Remove Unnecessary Low Frequencies
Apply high-pass filters to remove frequencies below the fundamental of each instrument. For example, high-pass vocals around 80-120Hz, guitars around 80Hz, and leave only kick and bass below 80Hz.
-
Cut Resonant Frequencies
Identify and reduce resonant peaks with narrow Q values (0.5-1.5). These are often instrument-specific problems that create harshness or muddiness.
-
Address Frequency Masking
When two instruments compete for the same frequency range, make complementary cuts. For example, if bass and kick drum conflict around 100Hz, cut that frequency in one and leave it in the other.
-
Make Gentle, Wide Boosts (If Necessary)
After making reductive cuts, you can make gentle, wide boosts (low Q values of 0.7 or less) to enhance the character of the sound. Keep boosts to 3dB or less when possible.
-
A/B Test
Regularly compare your EQ'd sound with the unprocessed version to ensure you're actually improving it. Use the power button on the EQ to quickly toggle between processed and unprocessed.
Visual Examples of Effective EQ Curves
Here are some typical reductive EQ approaches for common instruments:
- Vocals - High-pass at 100Hz, cut at 300Hz (narrow), cut at 500Hz (narrow), gentle boost at 3kHz (wide), cut at 6kHz if sibilant
- Kick Drum - Cut at 400Hz (narrow), boost at 60Hz (wide), boost at 4kHz for click (narrow)
- Snare - Cut at 300Hz (narrow), boost at 200Hz for body (wide), boost at 5kHz for snap (narrow)
- Guitar - High-pass at 80Hz, cut at 300Hz (narrow), cut at 2kHz if harsh (narrow)
- Bass - High-pass at 30Hz, cut at 400Hz (narrow), boost at 80Hz (wide), boost at 1kHz for definition (narrow)
Common EQ Mistakes
- Boosting too much - Adding rather than removing problem frequencies
- Solo syndrome - EQing in solo mode without checking in the mix context
- Over-processing - Making too many EQ moves on a single sound
- Ignoring phase issues - Creating phase problems with excessive EQ
- Focusing only on frequency, not time - Forgetting that EQ affects transient response
Practical Assignments
Put your knowledge into practice with these hands-on exercises designed to improve your compression and EQ skills in Ableton Live:
Assignment 1: Compression Parameter Exploration
Objective: Understand how each compression parameter affects sound.
Instructions:
- Import a drum loop into Ableton Live
- Add Ableton's Compressor to the track
- Set a moderate threshold (-20dB) and ratio (4:1)
- Experiment with different attack times (1ms, 10ms, 50ms, 100ms)
- Experiment with different release times (50ms, 100ms, 300ms, 500ms)
- Try different ratio settings (2:1, 4:1, 8:1, 20:1)
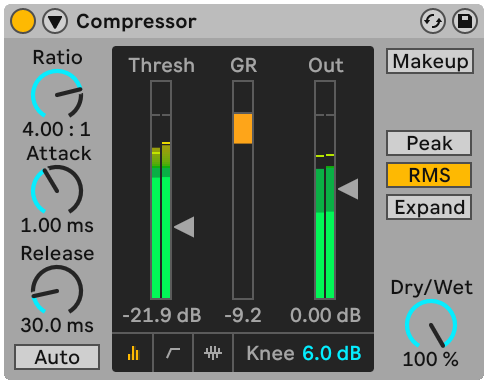
- Toggle between different detection modes (RMS, Peak)
- Document how each change affects the sound
Expected Outcome: A deeper understanding of how compression parameters interact and affect the sound of a drum loop.
Self-Evaluation Tips: Can you predict how changing a parameter will affect the sound? Can you set appropriate parameters to achieve a specific sound character?
Assignment 2: Reductive EQ Practice
Objective: Apply reductive EQ techniques to clean up a mix.
Instructions:
- Import a multi-track project with at least drums, bass, guitars, and vocals
- Add EQ Eight to each track
- Apply high-pass filters to remove unnecessary low frequencies from each track
- Identify and cut resonant frequencies in each instrument
- Address frequency masking between instruments with complementary cuts
- Make minimal, wide boosts only if necessary
- A/B test your changes regularly
Expected Outcome: A cleaner, more defined mix with better separation between instruments.
Self-Evaluation Tips: Is each instrument more clearly defined? Have you reduced muddiness and harshness? Can you hear all elements clearly without them competing?
Assignment 3: Advanced Compression Techniques
Objective: Implement advanced compression techniques like parallel compression and multiband processing.
Instructions:
- Create a return track for parallel compression
- Add a compressor with aggressive settings (high ratio, fast attack, medium release)
- Send different amounts of each track to this parallel compression
- On a bass track, add Multiband Dynamics
- Set different compression settings for low, mid, and high frequencies
- Create a drum bus and apply Glue Compressor for cohesion
- Experiment with sidechain compression on bass triggered by kick drum
Expected Outcome: A more dynamic, controlled mix with professional-sounding compression techniques.
Self-Evaluation Tips: Does the parallel compression add energy without destroying transients? Does the multiband compression provide more consistent bass? Does the drum bus sound more cohesive?
Resources
Recommended YouTube Tutorials
Additional Learning Materials
- Ableton's Official Manual - Audio Effects Reference - Comprehensive guide to Ableton's audio effects
- MusicTech - Compression and Limiting in Ableton Live - Detailed articles on compression techniques
- Production Music Live - EQ and Compression Masterclass - In-depth courses on EQ and compression
Key Terminology
- Threshold
- The level at which compression begins to be applied to a signal.
- Ratio
- The amount of compression applied once the signal exceeds the threshold. A 4:1 ratio means that for every 4dB over the threshold, the output will only increase by 1dB.
- Attack
- The time it takes for the compressor to reach full compression after the signal exceeds the threshold.
- Release
- The time it takes for the compressor to stop compressing after the signal falls below the threshold.
- Makeup Gain
- Volume added after compression to compensate for the reduction in level caused by compression.
- Q Value
- In EQ, the width of the frequency band being affected. Lower Q values affect a wider range of frequencies, while higher Q values target a narrower range.
- Sidechain
- A technique where one signal (like a kick drum) controls the compression of another signal (like a bass).